Wednesday, January 30, 2013

DIY sweater re-vamp with peter pan collar

Second star to the right and straight on to morning.......

 
Somehow I find cutting shit up is therapeutic. I'll just call it my mend and make do rehab. Maybe I'm just crazy. Quite possible. Anyway, I found this really cute butter colored cardi at the thrift store for a whopping $2. It was a bit plain but for a few bucks I figured I could make it work.
 
I've been kind of obsessed with the whole peter pan collar craze. So once again I went digging around in my stash of crafty goods to see what I could come up with to give my little sweater a new trendy look. And here's what I came up with:
 
A crochet pillow sham
some itty bitty lace
and a white sheet
 
 
First I cut 2 scallops from the edge of the pillow sham. I then cut through the center so I had two separate pieces.
yes those are kitchen shears, i couldn't find my scissors don't judge

I traced around my scallop onto a piece of paper adding a seam allowance. This was now my pattern to cut from my white sheet. Cut four, sew two together leaving the top portion open to flip. Then sew your scallop onto the your turned "sheet" piece. Again leaving the top part open and MAKE SURE each scallop faces an opposite way or you will end up 2 of the same side collar!! After you have both scallops sewn to your sheet pieces, turn the each top in and sew through all layers. You now have two  finished collar pieces.
 
Attach your collar pieces to your sweater collar with a straight stitch. At this point I didn't care for how the collar popped up and the stop and start of yellow to white. So I dug up a darning needle and some white yarn and used a blanket stitch all the way around the entire collar of the cardi. Problem fixed, now it lays flat like it should and looks cohesive instead of choppy.


Now line the lace up with the edge of the cardi and use a straight stitch to attach. Try not to pull to much on your sweater or it will pucker. Unless of course this is a look you want, then get on with your bad self ;) Repeat for the other edge.


I used my darning needle and my white yarn again to do a running stitch just inside the edge of the lace for a little extra detail.


TADAAAA!!!


And because I burned your retinas with my last SAHM i am post, I figured I'd give you a more pleasant selfie this time.......


Now when I re-read through these tuts I'm never sure if I'm making sense. So if there is something that seems off just let me know and I will try to explain better;)
 
Happy Crafting Folks
 
xo the Rebel

Tuesday, January 29, 2013

Project 365 w.4


 week 4
 
 
 Despite being ill I'm hanging in there on this new years goal. And still  loving it. I've found some new nifty photo apps for making grids, adding text and even handwriting to my phone photos (why is this so damn hard to do on a touch screen?!?) Gave me something to do while I was holding down the couch amongst my sea of wadded up tissues. Well that and watching Being Human on netflix. I did make up some crafty shit too and if I ever get around to taking pictures I will happily share.
 
On a bright note my spelling seems to have improved, that or my spell check is malfunctioning, LOL. And guess what? The February photo a day challenge is up on FatMumSlim, go check it out and join up! I'm off for an exciting date day with the railroader...we will be grocery shopping. What adventurers we are :P
 
xo the Rebel

Monday, January 28, 2013

SAHM i am style


Reality check.....


Lately I have grown a sincere appreciation for REAL bloggers. By real I mean real women, with real bodies, with real true talent, with real life issues, with real personalities. Just REAL. Am I making sense? Maybe not, could be cold med induced idiocy. Now I'm not saying that blogs should be a huge whine fest that's not something I would enjoy, but it's nice to know that these women are real, not fake always put together flawless barbie dolls that never fail. These women are people, people I could sit down and have a cup of coffee with and bs the day away. Here's a few that I really enjoy.......
 
 
See what I mean....REAL
 
That really got me thinking. I've been wanting to post another SAHM i am style but I've been sick, we all have been sick. So getting all put together just wasn't in the cards. And then I had a moment of clarity.......why do I feel the need to get dressed up just to do a post? That's not REAL this week, this weeks reality is pjs, crusty nose, and mountains of Kleenex! I want to be real here, this is my place, I have nothing to prove to anyone, that's not me. In real life I'm not that kind of girl, I'm the either you like me or you get the fk out of my kitchen kind of girl. So I decided to keep it real. (are you sick of that word yet?)
 
Here ya go, me in all my snot fountain, fevery, haven't slept in 2 days, glory.
Enjoy, laugh, gag, whatever. It's the real me ;)
 
 
Nice, thumb photo bomb lol
 

Can't leave out the "There's something about Mary" bangs :0
Now Im not saying I won't get dressed up to do SAHM i am posts. I will, because I like to. And I do enjoy reading blogs that do that. It's fun. But I do like the honesty in the posts, I do like that they are real woman with real figures. So for this week its just a reality check :) Hope everyone else is healthy and happy...I wouldn't wish this shit on anyone!

xo the Rebel

Sunday, January 27, 2013

Fruity Crisp


I know I kinda disappeared for a bit but I've been sick :( Actually all 5 of us got it and of course staggered so it's been a lovely couple of weeks. I'm so ready for spring! On that thought why not some berry goodness to perk us up?
 

Fruity Crisp


Totally sounds like a breakfast cereal, doesn't it! Here's my theory...if  you eat it warm with vanilla ice cream that melts over the ooy gooy goodness then it's kinda like cereal and milk. Which justifies it as a breakfast food, Right?!?! Right!

 
Alrighty I totally pulled this recipe outta my a** so if it sucks I'm sorry. I tend to be a bit of a mad kitchen chemist making sh*t up as i go;) I've been making an effort to write my recipes down per the gypsy prince's request. Although my theory is if I don't tell him how to make it he'll never move too far away so he can come home to eat...lmao. Right, the kid can cook like no body's business who the hell am I trying to fool.
 
 I typically don't measure but I did put an effort in this time to keep track..... Here's what ya need:
 

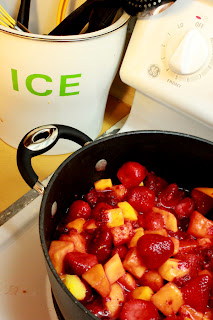
First you want to cook "down" your fruit. As I've said before I have the patience of a 2 year old. So I threw my sugar and frozen fruit in a pan  and simmered it until I had this-
 
Think fruit soup, that's about what it is. Once you have your "soup" nice and warm and bubbly slowly add your cornstarch slurry. (Guess I should elaborate....cornstarch slurry: 2tbsp cornstarch in idk 1/4c. of cold water) LMAO this is shaping up swell huh.
 
Continue stirring and simmering your "soup" until it's nice and thick. Almost a gel consistency. Set aside and now mix up your topping (well actually i sprinkled a bit on the bottom of the pan too so it'd be top and bottom lol).
 
Mix all your dry ingredients together first(oats,flour,brown sugar,spices,walnuts). Then cut in your butter until you have a nice crumb texture. You can omit the walnuts if you wish but I really like the crunch factor it adds to the crust. 
 
Sprinkle a small amount on the bottom of your pan, then pour your fruit "soup" on top. Then sprinkle the remaining topping over. Here's where the honey come into play. I warmed mine up for a few seconds in the microwave and drizzled it over the top of my crust. YUM
 
Throw it in the oven and bake @ 350 for 35 minutes  or so. Basically until it is nice and brown and the filling is bubbly. Yeah, I usually don't time things either. (Okay so the railroader is sitting here watching me try to write this and remember how long I cooked it and what i put in it and laughing his a** off at me. He says "you got some bugs to work out in the whole recipe writing thing"....what a brat)
 
Now enjoy with a big a** scoop of vanilla ice cream! Breakfast of champions!!
 
xo the Rebel

Wednesday, January 23, 2013

Project 365 w.3


Week 3
 
 
uhhgggg this illness is kicking my a**. that's all i got. Rebel out...
 
xo (on second thought you don't want em, their contaminated)

Monday, January 21, 2013

Maple Bacon Cupcakes

 So the other day the railroader and I were out and about on a mission for steel pipe for another project that if ever gets finished I will share. And we happened to stop at a local cafe for soup for sick gypsies and I spotted in their bakery case, Maple Bacon Pancake muffins. Hmmmm, I thought. I wonder what that tastes like? And I KNOW the Gypsy Prince would be on board to try this out. There is some serious bacon worship that goes on here at the funny farm. And the gypsy prince claims bacon goes with EVERYTHING. Off on a google search I went for a recipe.....

Vanilla Garlic Blog

Lo and behold, look at what I found! Seriously yummy blog with sprinkles of snarky humor. Right up my ally!! Really, go read this even if bacon desserts are not your thing. It will make you giggle. I followed the recipe with some minor adjustments- I did not have self rising flour so I used the pastry flour I had on hand. I added more bacon, increased the bacon fat to 2 tbsp. and reduced a 1/2c. of maple down to 1/4c. instead of the 4tbsp. it called for. And instead of the frosting called for, I made Martha Stewarts Maple Cream Cheese frosting. Here's the verdict....
 

Wee Stalin was completely offended lol. I think this may have been due to the piece of bacon that garnished the top in her frosting. She just felt it was wrong i guess. Queen B loved them but felt the cream cheese frosting wasn't quite a right fit and maybe next time we should try something different. The Gypsy Prince sadly was still so ill with the flu he couldn't manage to even try; much to his disappointment :( And the railroader was smitten at first bite! I myself am still on the fence, just not quite sure what to think of the collision of flavors. They remind me of a sweet cornbread and I think I have to agree with Queen B, the cream cheese frosting is not a good fit. If I make them again I will use the frosting called for and I think find a really good quality bacon to use. I think that might amp the flavor a bit. Also, I got 12 standard size muffins out instead of the 6-8 it says without increasing anything.
 
All in all, not a complete fail and I added vanilla garlic to my reader because it truly is a fantastic blog. I really like his writing style and sense of humor. Not to mention there are other recipes that I plan on trying like this garlic bread, yummmmmm. You have to read the post, it's great. Stories on being a poor college student and ramen noodles. Hilarious and thought provoking. Im sure everyone can relate to the early culinary years when money was tight and the need to be creative.
 
What have you been cooking up lately? Im always up for a new recipe if you want to share!
 
xo the Rebel

Sunday, January 20, 2013

DIY arrow necklace

Well hello, whatcha been up to? We've been bed ridden over here. One word...FLU. Yuck. Despite being on a strict diet of 7-up I still have been crafty,  albeit in bed watching countless hours of Netflix.

Found here, here, and this last one was on amazon but is now gone
I've been lusting after these type of necklaces for some time now. But the price tags and my strict adherence to no frivolous spending had me just wishing. Until I had the grand idea (in between retched I can't move moments) to make my own. I went digging through my crafty mountain of supplies to see what I had to build it. And here's what I came up with:

  • craft wire
  • gold nail polish
  • an old necklace to de-construct
yep, that's a ramen noodle box ;)
I drew an arrow on a piece of cardboard with the intention on of using pins as a guide for my wire. Well that was an epic fail. So I just bent and twisted my shape free hand. I started with a long-ish (remember I suck at measuring) piece of my craft wire. I used a crochet hook to bend my wire in half around and twisted to give me the first loop. Then I split the wire and formed a triangle, again twisting at the bottom of my triangle. Continue twisting to form the shaft of your arrow. Split the wire again to form the quills (had to ask the railroader what the feathers on an arrow are called haha). After each quill twist your wires together. At the end use your crochet hook to twist around forming your last loop and clip the ends. I used a pair of needle nose pliers (pilfered from the railroaders tool box) to flatten my quills and loops.

After I had my arrow complete i decided it needed to be gold. After a search through my paint box I realized I had nothing shiny. So onto the nail polish stash. SCORE!!! I just painted both front and back with multiple layers, allowing it to completely dry in between. Thank god for express dry nail polish, cause I have the patience of a 2 year old in a toys-r-us ;)

Then I just de-constructed a necklace I already had attaching a jump ring to both loops on my arrow and viola!!!

What do you think? Maybe its dorky but I dig it. And I didn't spend a dime!! Im really quite proud of myself for sticking to my new years goal of using what I have. How are you doing with yours?

Happy Crafting :)

xo the Rebel

Wednesday, January 16, 2013

Introducing SAHM I am style......


I am a dork for outfit posts! I love them, and 90% of the time I am in mama uniform aka. sweats, slippers and bed head....So I thought it might be fun to do some outfit posts of my own and give myself a reason to actually get dressed! Hooray :) And since "embracing the new me" is on the 2013 goal list and I want to take part in the whole 365 project craze this is a total score in the goal checklist column!!

So a little bit about this whole embracing the new me goal. In the last  year I lost a lot of weight. I mean like an entire small person amount of weight. And before anyone asks no, I don't have some magic trick, or awesome diet. I can say it was alot of walking and an extreme amount of stress. I started walking not for exercise but as a frustration release. Before I knew it I was walking between 4-6 miles a day(Since our big move from city living to the funny farm I haven't been walking, sad face). And then I don't know exactly what happened, the stress I guess just flipped a switch inside and food started making me really really sick. It sucks, I like food. I really really like food. It's slowly getting better and I need to get back to walking. But Im left with this body that I am not at all familiar with. I feel weird in my own skin. So I figure these "SAHM i am style" posts will help me see that I am still in fact in here and it's not some case of the body snatchers..lol.

 Now please keep in mind Im no fashionista, most  times it will be function over fashion. And I'm struggling with learning how to take self portraits. Like in a big way , so for starters they will be phone pics and basically like one of those cheezy picture puzzles. My apologies in advance ;)

So here's my first installment: I am "Snow" angel (haha get it? im no angel..lol im a nerd)


Right now it's layers and layers and more layers because it is Brrrrrr cold outside. I mean snot freezes in your nose cold. Now I know there are skinny jean & boot  haters out there. But hear me out. I hate the bottom hem of my pants getting wet, I mean it makes me want to hulk out and smash things. And.....since I've lost so much weight I can actually wear skinny jeans and the boots actually zip over my leg. So it's a bit of a novelty for me;)
A bit of behind the scenes....I ran (i mean that literally) outside for all of 4 minutes and shot some quick photos before my eyes teared up from cold and froze my freshly applied lashes together and my bulbous highlander nose turned bright red (thanks dad for the Scottish heritage) .I didn't do my hair, I hardly ever do. Especially since it's so damn cold i wear a hat (even inside!) I did however put fake lashes on, why? IDK it seemed like a fun idea at the time and I saw this tutorial on how to put them on and wanted to see if it worked....Happy to report it does!! So go check it out and rock some falsies even if your snowed in and the only one that sees is your netflix account :) 

xo the Rebel

Monday, January 14, 2013

Project 365 w.2


Week 2
 
 
Ahh this last week...... Wee stalin home sick ALL week, Arctic omg i can't feel my fingers temperatures, a dorky dog that flat refused to get out from under the covers..period, finished up some crafty goodness, and made fruit pasties that were inhaled so fast I wasn't sure if I even made them at all or just dreamed it...lol..kinda like that damn map pendant. I am still in love with #fmsphotoaday IG challenge. So much fun to put your own spin on the day's challenge. If your not playing along, you need to be! Check it out here
2 weeks down 50 to go!!!
 
xo the Rebel
 

Sunday, January 13, 2013

DIY mini sewing kit

I find in my Crafting Manic Disorder I usually don't have my big girl camera out and usually don't want to fool with it because I'm making something dammit. My phone however, is much handier (hmmm that is a word ,right?) Anywho I used my phone for all of these pics. We will see how it goes, but maybe that will be some installment..crappy phone pic tuts...lol or maybe IG craft nerd tutorials...hmmm


Oh how I love how this lil bit of pure goodness turned out. If you couldn't already tell it makes me very very happy:) So enough of reading me gush all over this and get right to the goods....how the hell do I make one for my very own? (because I have to have one right this minute..No?)

Hyena In Petticoats

Okay, I started with this tutorial here on how to make a cathedral quilt block. AMAZING instructions, step by step pictures, just all around fabulous tutorial. I got lost in this blog forever and added it to my reader. You must go see for yourself, you will be glad you did! What ever did we do before Internet?


So then I had this piece, and was not sure what to do with it. I didn't want to make a pincushion, seemed everyone had made a pincushion. Then after WAY to much coffee "Eureka"!! If I fold back each side it makes a little book! Yay! First I sewed all the edges of the 'window' openings down, and then embroidered an anchor in the center of my colored piece. I just free-handed a simple one right on the fabric with a pencil.

Next I cut a piece of felt just slightly smaller than my finished block. This is the inside 'pages' of your book. Now cut a thin piece of cardboard in a square to fit in the center of both the block and the felt piece. (i used a piece left over from the idea book).

Using a small pair of scissors as a guide, mark the center of finger holes and either side of blades. Sew small buttons in finger hole mark and clip on outside edge of blade markings.

Cut a short piece of bias tape, and using a lazy daisy stitch, make a heart. You can skip this if you want, I just really enjoy the little details.

Slip each end of bias tape through the slits in the felt. Flip over and glue ends down to the back side.

Now glue your cardboard to the center of your felt. Leaving equal parts free. These will stay free as your pages. Use something heavy to set on top to ensure a good even bond. Yes, that is a marble statue of a nose ;) Next glue the cardboard and felt to the center of your cathedral block. Again using something heavy on top.


Sew a seam on either side of your block center. This allows for the flaps to fold back. On the inside I used some cute thread to do a long stitch across to cover the seam.

Cut a small scrap of fabric and a small scrap of felt . Sew the two together around the edges. Attach to the felt page by hand. Make sure your stitches are even  on the back side as they will hold safety pins also!!

Last part, sew a button in each of the 4 corners of the edges of your original block. Tie a cute string to the top left corner. This is the closure for the kit.

Now load her up with all your supplies and get to sewing!!! I think it would be cute too, to send to a friend as just a little pick me up!


I couldn't of course stop there....oh no, no. I had to make a pouch for it to go into too!!Lol, but that is another tutorial with a billion more pictures.

Let me know if you make one!

xo the Rebel

Friday, January 11, 2013

Project 365 w.1


Photo a day

w.1


I'm so glad I decided to do this. I am taking photos all day and I love going back through and seeing my day from a different perspective. I have been getting back into the swing of things with my big girl camera. And Im embracing my camera phone too.  I've been playing along with a little IG challenge @fatmumslim #fmsphotoaday. I'm really having fun with this, are you doing any challenges? I want to see!!
 
xo the Rebel